
How to Apply an Iron-On Patch Like a Pro
Share
Iron-on patches are a fun and easy way to customize hats, jackets, backpacks, and more. But if you want them to stay put and last, you need the right technique. Follow this simple step-by-step guide to apply your patch like a pro!
What You’ll Need
✅ Your iron-on patch
✅ A garment or accessory to apply it to (hat, jacket, tote bag, etc.)
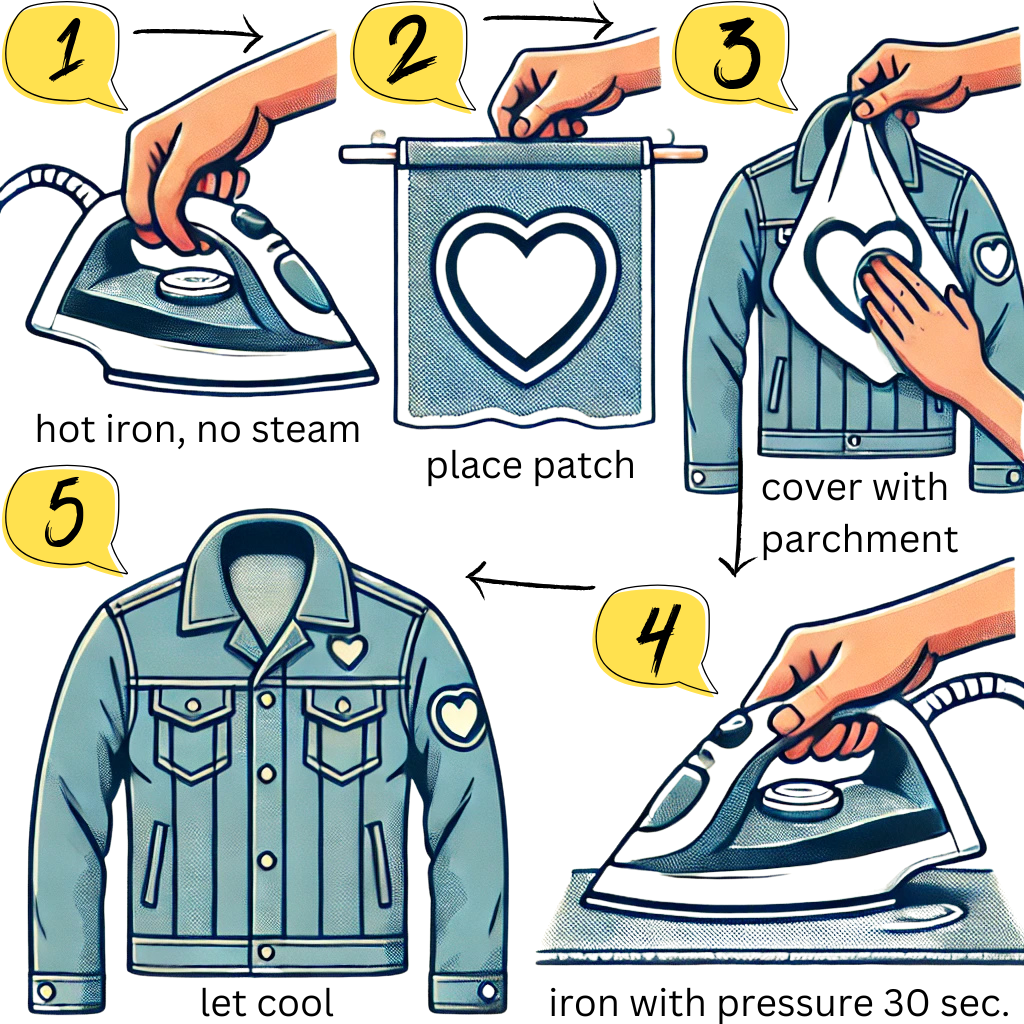
✅ A household iron (no steam!)
✅ A thin cloth or parchment paper (to protect the patch)
✅ A flat, heat-resistant surface (like an ironing board)
✅ (Optional) A heat press for extra durability
Step 1: Choose the Right Fabric
Patches work best on cotton, denim, and canvas—natural fabrics that can handle heat well. Avoid synthetic materials like polyester, silk, or nylon, as they can melt under high heat.
Step 2: Position Your Patch
Decide where you want your patch to go. Once you’ve found the perfect spot, lay your garment on a flat surface and smooth out any wrinkles.
📌 Pro Tip: If you’re adding a patch to a curved surface like a hat, you may need to hold it in place firmly while applying heat.
Step 3: Set Your Iron to the Right Temperature
Turn your iron to the "Cotton" setting (around 300°F or medium-high heat).
🚫 No steam! Steam can prevent the adhesive from bonding properly.
Step 4: Cover and Press
🧵 Place a thin cloth or parchment paper over the patch to protect it from direct heat.
🔥 Press the iron firmly over the patch for 30-45 seconds. Apply even pressure—don’t slide the iron around, as this can shift the patch.
(Placeholder for a pressing image)
Step 5: Flip & Press Again
For extra durability, flip your fabric inside out and apply heat to the back for another 30 seconds. This helps melt the adhesive evenly and ensures a stronger bond.
📌 Pro Tip: If you’re working with a thick fabric (like denim), hold the iron down a little longer—up to 60 seconds per side.
Step 6: Let It Cool
Once you’ve applied enough heat, let the patch cool completely before touching it. This allows the adhesive to fully set.
Step 7: Check the Edges
After cooling, gently tug at the edges of the patch. If they lift, repeat the ironing process with a bit more heat and pressure.
📌 Want Extra Hold? Stitch around the edges for maximum durability—especially if applying to a high-movement area like a jacket sleeve or a hat.
FAQs & Troubleshooting
Why is my patch peeling off?
- The fabric might not be heat-friendly (synthetics don’t bond well).
- The iron wasn’t hot enough or steam was on—try reheating.
- The patch needs extra stitching for a long-lasting hold.
Can I wash an iron-on patch?
Yes! But to keep it in top shape:
- Wait 24 hours before washing.
- Wash inside out on cold.
- Air dry or use a low-heat setting in the dryer.
Can I use a heat press instead?
Absolutely! Set it to 300°F and press for 15-20 seconds for an even stronger bond.
Now You’re a Patch Pro!
With these steps, you can customize hats, jackets, totes, and more like a pro. Want to grab some unique iron-on patches? Check out our latest designs [here]!